Showing posts with label DNS settings. Show all posts

Saturday, October 4, 2014

how to change dns settings on iphone and ipad


how to change dns settings on iphone

Banned from iPhone and iPad to enter the sites that you need to change the DNS settings let me explain how. Banned from iPhone and iPad to enter the sites unscheduled how to change the DNS settings for iOS and try to explain.
from iPhone and iPad devices, some sites are unable to. For example, "YouTube, Twitter" like sites. Making changes to DNS solutions can have access to banned sites. From now on the iPhone and iPad by following the steps below you can enter to enter the site you want.

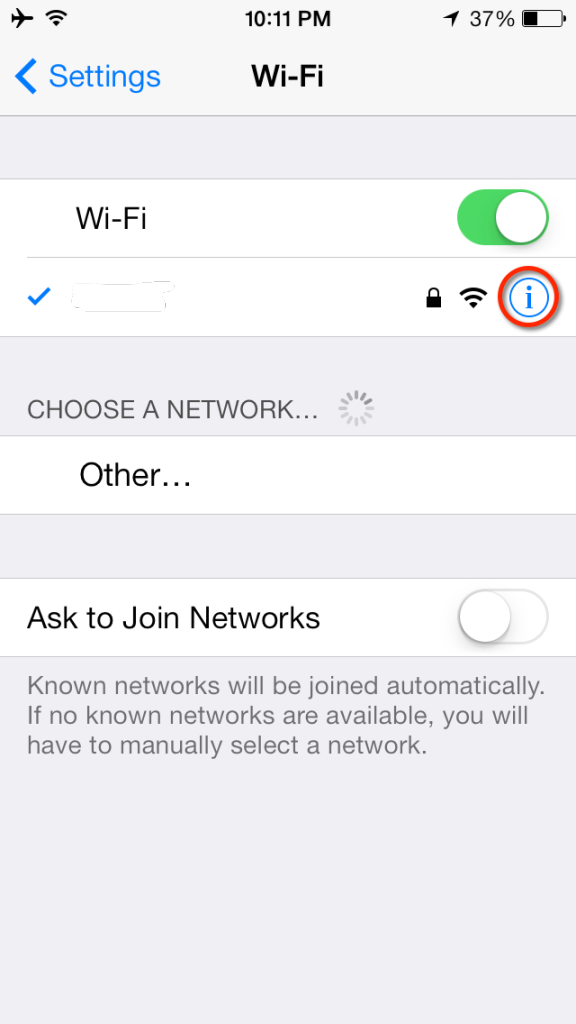
iPhone and iPad from the Settings menu, select Wi-Fi. Modem that is connected to the Internet information on the arrow next to the blue '>' click on the icon.


Here's how to change your iPhone's DNS servers:


From the iPhone's home screen, tap Settings.

Tap Wi-Fi. The screen shown below appears. The available wireless networks in range of your iPhone appear, as shown below.


Find your wireless network in the list, and then click the arrow. The screen shown below appears.


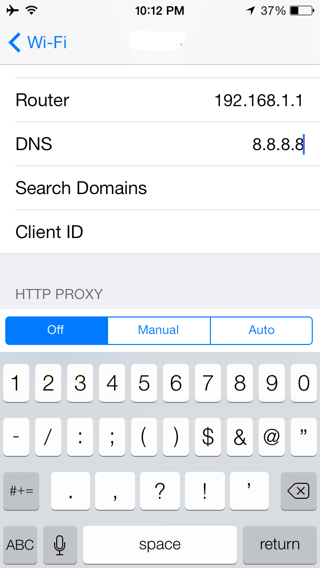
 Tap the DNS field.

Delete the current DNS servers, and enter the new DNS servers. (If you enter more than one DNS server, be sure sure to separate the servers with commas.)

To use OpenDNS, enter 208.67.222.222 and 208.67.220.220
To use Google DNS, enter 8.8.8.8 and 8.8.4.4

dns Replacement iPhone 5, change dns ios, iPhone Configuration for OpenDNS, How to change your DNS on Iphone/Ipad/Ipod, How to Change Your iPhone's DNS Servers


Web address; http://programsepetimiz.blogspot.com.tr/
E-mail address; programsepetimiz@gmail.com
Facebook address; https://www.facebook.com/programsepetimiz
Twitter address; @programsepeti ve @selimzor

Friday, October 3, 2014

How to Change DNS Settings on Android


You can change the DNS settings on Android devices usually unscheduled.
Click on Settings in the main menu. Click on the Wireless Network Settings in the menu if a modem which is connected to the modem and modem information comes from the menu that appears and hold on the name of the network in the network change and have forget you're saying you change network.

Home> Settings> Wireless> part of the network from the WiFi is active on're going to keep pressing the touch. "Change Network" flag. Click Show advanced options. IP Settings, DHCP, replace it with the seçilidir.statik.

Options; Select Advanced from the advanced options will be part of the IP settings drop-down menu section are activated using a static IP. Then the IP Address, Subnet Mask, and we need to configure the DNS settings.

Our part of the IP address in the IP Address automatically change the DNS settings here you come.

DNS 1 and DNS 2 4.2.2.2 4.2.2.1 settings we need to do. Employees with a DNS address after you make these settings back just to save wounds remain.

There are applications that allow us to change the DNS and you can download from the Android Market.

Access to restricted sites on your Android device absolutely must change the DNS information in the process.
As in the computer either manually or programmatically able to do DNS changes. We recommend setting your DNS settings manually if you run fewer applications because of how much performance you'll get it from your Android device.

DNS 1 and DNS 2 DNS settings area that Google can enter 8.8.8.8 and 8.8.4.4. Following this process, turn off your internet connection; If you open it again, you can log in to the site you want without any problems.

To change the DNS settings:

Open the Settings on the device.
Select “Wi-Fi”.
Long press your current network, then select “Modify network”.
Mark “Show advanced options” check box.
Change “IP settings” to “Static”
Add the DNS servers IPs to the “DNS 1”, and “DNS 2” fields.
Press “Save” button, disconnect from the network, and reconnect for changes to take effect.
UPDATE: Note that setting IP Settings to “Static” will affect the way that DHCP does address allocation and can be used only as a short-term solution. In order to work correctly, you have to configure your router and assign static IP to the device’s MAC address.


How to change DNS address in KitKat Android Phone

Enable Wi-Fi and open Wi-Fi settings, long press your router and select “Modify Network” option.

Check “Show Advanced Options”, scroll down and change IP settings from DHCP to Static. Save the option

Now, scroll down to DNS 1 and add the new DNS IP. For Google DNS type 8.8.8.8

Select DNS 2 and add the second DNS IP. For Google DNS type: 8.8.4.4


How to achive device wide DNS settings

The above method is for single Wi-Fi connection. If you need to use your new DNS on all your connections including 3G/4G, you can use a free app DNS Changer, but the app requires root access.


If your device is rooted, install the app from Play Store. Once installed, you can quickly set DNS servers IP manually or select them from a list of DNS providers. You can set program to automatically apply these settings both to Wi-Fi and 3G/4G data connection.

popular free DNS services

Google Public DNS:
DNS 1: 8.8.8.8, DNS 2: 8.8.4.4

OpenDNS:
DNS 1: 208.67.222.222, DNS 2: 208.67.220.220

Comodo Secure DNS:
DNS 1: 8.26.56.26, DNS 2: 8.20.247.20

Norton ConnectSafe:
DNS 1: 198.153.192.40, DNS 2: 198.153.194.40

Web address; http://programsepetimiz.blogspot.com.tr/
E-mail address; programsepetimiz@gmail.com
Facebook address; https://www.facebook.com/programsepetimiz
Twitter address; @programsepeti ve @selimzor

Wednesday, October 1, 2014

How to Change the Windows DNS Settings? Prohibited Method Introduction to Site?


How to change DNS Servers in Windows

How to change DNS Servers in Windows 7

Access to banned sites are usually done by changing the DNS settings. Social networks and movies, series and games sharing sites that are generally prohibited.
Introduction to Banned Sites


Go to the Start Menu and click Control Panel


In the Windows Control Panel, under Network and Internet, click View network status and tasks.
 

Click the link next to Connections on the right. In this screenshot we're using a wired connection so the link is called Local Area Connection. If you're using Wireless the link will be named differently.


You'll see a connection status window, click Properties.


Select the Internet Protocol Version 4 (TCP/IPv4) item, and click the Properties button.


Select Use the following DNS server addresses, and enter:

Preferred DNS server: 212.159.13.49
Alternate DNS server: 212.159.13.50

Finally click the OK in this and the previous windows to save your changes.

The following pop-up window on the screen from the "Use DNS Server address" option we choose. areas generally preferred and alternate DNS servers are "4.2.2.1" and "4.2.2.2" We are writing and saying, okay, we are closing all the windows. 

Other DNS addresses; "4.2.2.3" and "4.2.2.4", "208.67.222.222" and "208.67.220.220" 


These amendments have changed the DNS settings after the procedure and will be able to login to banned sites.

windows 8 DNS settings to change how your windows 7 dns settings change how Windows 7 DNS Changing the TCP / IP settings change, change your DNS in Windows 7 Visual Expression, DNS settings How win7, Banned Sites Introduction to DNS, Banned Sites Entering Method, windows 7 changing DNS, Changing DNS Settings in Windows XP, Dns Changer, How to change DNS settings in Windows 7 | 8

Web address; http://programsepetimiz.blogspot.com.tr/
E-mail address; programsepetimiz@gmail.com
Facebook address; https://www.facebook.com/programsepetimiz
Twitter address; @programsepeti ve @selimzor